
Shopware SEO summary
Shopware is an incredibly powerful e-commerce platform. But before you can start using the platform, it is important to understand the basics
Things you absolutely need to pay attention to:
- URL structure
- Paging (is regularly implemented incorrectly)
- Use of the “no index” robot tags (how to use them correctly)
- Use of the “no follow” tag (how to configure correctly)
Content overview
- What does it take to rank a Shopware store well?
- A solid technical foundation for a good SEO ranking
- Optimize your content for maximum relevance
- Other SEO topics you should consider
Founded in Germany in 2004, Shopware is becoming one of the leading open-source e-commerce platforms. Its customers generated sales of EURO 6.05 billion in 2018. Shopware is already the market leader in Germany, and its market share is growing rapidly outside Germany.
In the last few years, Shopware has become the biggest alternative next to Magento. A user-centric approach is a recipe for success to inspire visitors.
Shopware is supported by an active community of developers who have developed over 3,500 plugins and hundreds of themes and continue to develop them.
You have a Shopware store, but no good SEO performance yet? Then buckle up, because in this ultimate guide we describe from start to finish how you can change that and increase user traffic for your Shopware store!
What does it take to rank your Shopware store well?
Before we can answer this question, it is important to understand how SEO works.
In short, search engine crawlers visit websites and try to find as much content as possible. They try to find out what content is about and whether it should be displayed in the search results at all. This is because not all content is relevant. Some content is highly popular and therefore ranks higher in search results.
The “three pillars of Search engine optimization”:
1. Technology: the technical foundation of a website that helps search engines find and crawl your website as quickly and efficiently as possible. It’s about being at the forefront of technology to keep up.
2. Relevance: what search queries are your content relevant to? This is done by creating content that is useful and satisfying to your visitors. Reliable technology is essential to clearly communicate this relevance.
3. Trust/popularity: links to your website that confirm your trustworthiness.
This article focuses on two of the pillars, technology and relevance, because they are platform dependent and the popularity is the same for all platforms.
A solid technical foundation for SEO performance
In this section, you will learn in detail how to configure your Shopware platform for maximum SEO performance. Of course, the Shopware platform must run on a solid hosting environment. We use the Hypernode hosting platform for our Shopware test environment because it is known for its excellent support, performance, and scalability.
URL structure
A good URL structure is something that works for both visitors and search engines. So pay attention to the following in your URL structure:
- Descriptive and readable
- Short
- Uniform
- Lowercase
To do this, log in to your Shopware backend and navigate to your URL structure settings:
1. default location: https://domain.com/backend/
2. go to Configuration > Basic settings
3. open the Frontend folder and navigate to SEO / router settings.
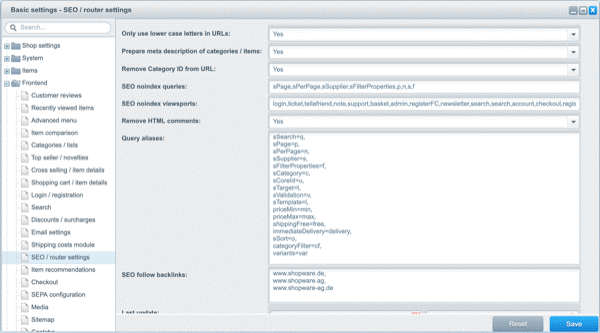
You get this view:
Shopware display for SEO / Router settings
General settings of the URL structure
Check your settings there and change them if necessary:
The Use only lowercase letters in URLs field should be set to Yes (default). This ensures that auto-generated internal links are always lowercase, and uppercase URLs are converted to lowercase on request.
Optionally, set Remove Category ID from URL to Yes. By default, this setting is unnecessarily set to No. Setting it to Yes removes the ?c=XX variables that are otherwise added to product URLs.
URL settings for product categories
The field that determines the product category URL structure is the SEO URLs category template, which defaults to {sCategoryPath categoryID=$sCategory.id}/.
This will result in a URL like https://domain.com/category/ or, in the case of a subcategory, https://domain.com/category/subcategory/.
We recommend a trailing backslash at the end of each URL, but if you don’t want that, you can change the value to {sCategoryPath categoryID=$sCategory.id} to remove it.
Product URL settings
The field that sets the product URL structure is the SEO URLs item template and this is set by default to {sCategoryPath articleID=$sArticle.id}/{$sArticle.id}/{$sArticle.name}.
This will result in a URL such as https://domain.com/category/$number/product, or in the case of a subcategory https://domain.com/category/subcategory/$number/product.
Specifying {$sArticle.id} in the URL is useful if you have 5,000 or more products, for example. If you have fewer products and their names are always different, you can omit the number and thus keep your URLs shorter and more meaningful.
As mentioned earlier, we recommend final backslashes at the end of each URL. Change the value in {sCategoryPath articleID=$sArticle.id}/{$sArticle.id}/{$sArticle.name}/ to add this.
Manufacturer URL settings
We strongly recommend using manufacturer-specific pages to increase the relevance of your product detail pages to a manufacturer’s brand name, and thus achieve targeted search queries for the brand name itself.
Important
Please note that the terms “manufacturer” and “supplier” are used interchangeably in Shopware. Here we always refer to the manufacturer, although the supplier is not necessarily the manufacturer of the product.
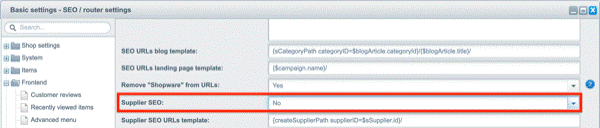
In Shopware, the field that sets the structure of the manufacturer URL is the Supplier SEO URLs template, which defaults to {createSupplierPath supplierID=$sSupplier.id}/.
This will result in a URL like https://domain.com/manufacturer/.
If you do not want to use manufacturer pages, you can disable them by selecting No in the Supplier SEO field:
Shopware’s settings for manufacturer URLs.
URL settings for blog articles
If you want to use the blogging feature in your Shopware store, you need to make sure that your blog articles have a good URL structure.
The field that sets the URL structure of the blog article is the SEO URLs blog template, which defaults to {sCategoryPath categoryID=$blogArticle.categoryId}/{$blogArticle.title}.
This will result in the following URL structure https://domain.com/blog/category/article.
To add the trailing slash, simply change the value in the field to {sCategoryPath categoryID=$blogArticle.categoryId}/{$blogArticle.title}/.
If you don’t want to put your articles in a subfolder, you can change this by changing the value to {$blogArticle.title}/, which will create a URL like https://domain.com/blog/article/.
Important
By default, blog article URLs do not have a trailing slash, while pages in the Shop section do. This is inconsistent and you should change this. Because a good, consistent URL structure is important for both SEO and UX.
Store pages URL settings
You can set the default URL structure for store pages and for regular pages like “About Us” and “Terms & Conditions”.
The field that determines the URL structure for these pages is the Custom site SEO URLs template and this is set to {$site.description} by default.
To add the trailing slash, simply change the value to {$site.description}/.
URL settings for form pages
You can set the default URL structure for pages that refer to forms, such as your contact page.
The field that sets the URL structure for these pages is the Form SEO URLs template, which defaults to {$form.name}.
To add the trailing slash, simply change the value to {$form.name}/.
URL settings for campaigns
Let’s say you are running a campaign for Black Friday. You can create this campaign under Marketing > Shopping Worlds. The URL of the campaign is determined by the SEO URLs landing page template field and is set to {$campaign.name} by default.
To add a trailing slash, simply define the value with {$campaign.name}/.
Shopware automatically rewrites special characters
Shopware uses the Slugify framework to rewrite special characters like ä, ö and ü. We recommend leaving this as it has proven to be very effective. For example, if you want to check if your canonical link matches the URL you are on, you can let Slugify rewrite the special characters.
However, if you don’t want to do this with Shopware, you can customize the Slugify ruleset.
Clear cache after changing URL structure
After you change the URL structure of your website, it is important to clear the cache and have Shopware regenerate all URLs.
To clear your website’s cache, go to Configuration > Cache/performance and select Cache/performance:

Navigate to the Shopware Cache settings.
At the settings screen, click the Clear cache) button at the bottom right:
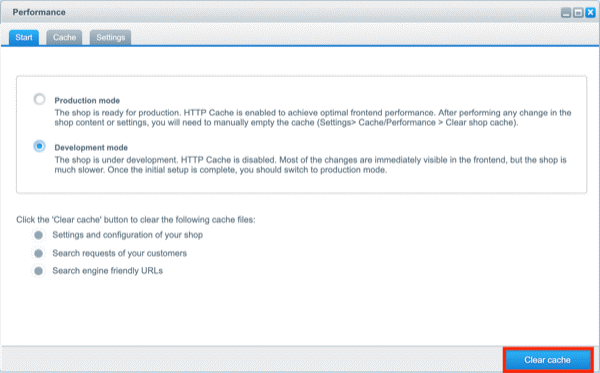
Shopware Cache Settings
Automatic redirects after URL changes
When you change a URL, Shopware automatically performs a 301 redirect from the old URL to the new one. While this functionality is good for usability and from an SEO perspective, it can cause some headaches when publishing new pages with a redirected URL. Namely, when an existing URL slug is assigned to a new page or product, the redirect is removed.
The title and meta description of your page have a huge impact on ranking, both directly and indirectly. What it means. Using important keywords in your title helps your pages rank for those keywords. And once your pages are ranking, you want users to click on your snippet, not your competitors’. Along with the URL, the title and meta description have a big impact on whether or not a user will click on your snippet. Think of them as your elevator pitch.
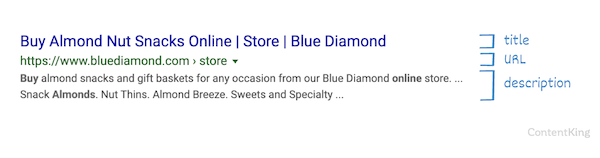
A snippet of Google’s search engine results that displays the title and meta description.
It is therefore important that you think carefully about what you write in your titles and meta descriptions. You can save a lot of time by defining smart defaults for them. In most cases, these should result in a good title and meta description. If you want to override them because it’s a really important page, you can follow the instructions in the next section.
Set intelligent default values for titles
It is not possible to define title templates in Shopware “out of the box” (freely); the structure of titles is fixed and defined as follows:
Product categories and product detail pages
Category pages: $categoryName | $shopName, for example: “Superfoods | Your healthy food store”.
Subcategory pages: $subcategoryName | $categoryName | $shopName, for example: “Nuts | Superfoods | Your healthy food store”.
Product detail pages: $productName | $subcategoryName | $shopName, for example: “Almonds | Nuts | Your healthy food store”.
Blog categories and blog article pages.
Blog category pages: $blogCategoryName | $shopName, for example: “News about healthy eating | Your healthy eating store”.
Blog article pages: $articleName | $blogCategoryName | $shopName, for example: “These nuts are a blast! | Healthy Food News | Your Healthy Food Shop”.
Other pages
CMS, form, manufacturer or campaign pages: $pageName | $shopName, for example: “About us | Your healthy food store”.
We recommend changing these titles to shorten them, as they can easily become too long with the default structure. This causes search engines to abbreviate your titles and change them to titles that lack focus and therefore have little value for SEO.
You can change the title templates in the code, or use a plugin to do so.
Define smart default settings for meta descriptions.
You cannot define a meta description “out of the box” in Shopware. There is only an option for Shopware to use the first 150 characters of your content as the meta description. This setting is enabled by default. Unless you have manually entered a separate meta description.
To configure this, go to:
1. configuration > basic settings
2. open the Frontend folder and go to SEO / router settings
You will end up on this screen:

Shopware SEO / Router settings (router settings) screen.
Look for the second field from the top; Prepare a meta description of categories / items.
Similar to the title tag, you have the option to define templates in the code or use a plugin for this.
Heading structure
A good heading structure helps visitors quickly crawl a page and search engines easily understand the structure and topic of the page.
Here are the best practices for heading structures:
Do not include logos or images in H1 heading tags, as the H1 heading conveys the main theme of the page.
Each page should have an H1 heading; therefore, use only one H1 heading per page.
For readability, it is a good idea to limit the headline length to a maximum of 60 characters.
Build your heading structure with a logical hierarchy, as shown below.
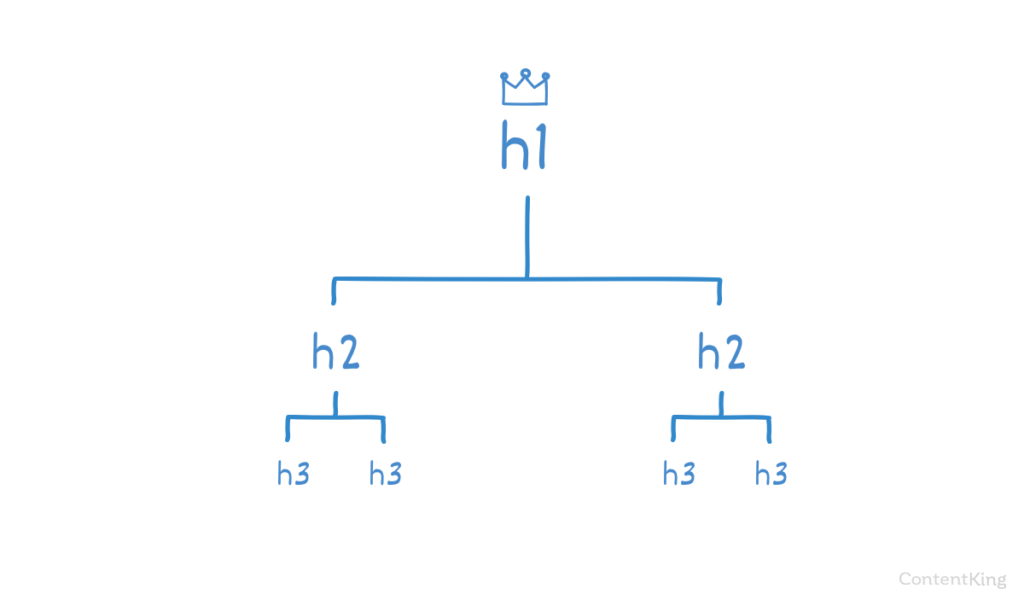
Representation for a heading structure of a document
Themes dominate your heading structure
The correctness of your heading structure is largely determined by the theme you use – not Shopware. For example, if the theme puts the product name in an H2 heading instead of an H1 heading, this must be accounted for in the theme’s code, as there are no settings in Shopware to correct this.
Format headings yourself
When it comes to formatting text content, you have it in your hands to choose the right heading formatting. For example, if you’re writing the content for a landing page/target page, you can fully control that.
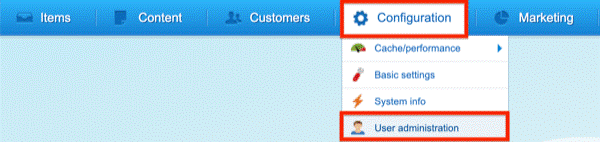
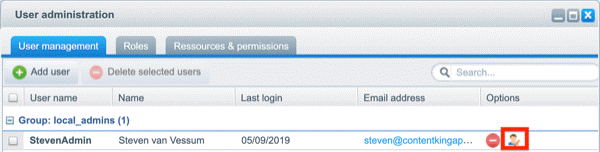
To make your life easier, you should enable Extended editor, which allows you to select headings when editing content instead of having to use the source editor. By default, the Extended editor is disabled, but you can easily enable it by going to Configuration) > User administration:
Navigate to the Shopware user administration (User administration).
There you select the user for whom you want to activate the advanced editor:
User management in Shopware
In the following screen, activate the advanced editor under Individual user options:
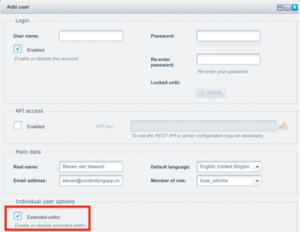
Activate the Shopware advanced editor
After activating the advanced editor, you will need to log out and log back in to use it.
Tips for the correct design of headings:
Pay attention to the names of your product categories, products, blog articles and landing pages, as these names are used as H1 headings by default.
Do not use H1 headings in the body, as this will result in multiple H1 headings (see above).
Navigation
Navigation plays a huge role in the SEO performance of any website, as well as your Shopware store itself.
It is best to display only the most important pages of the website in the main navigation, so as not to scatter the internal links too much.
Managing the main navigation
The main navigation of your store should contain product categories.
To manage store page groups, go to Items > Categories.
When you click a product category, you will see the following settings:
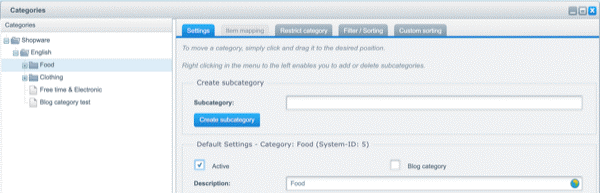
Managing categories in the main navigation
Only categories marked as Active will be displayed in the main navigation, while you will see in the anchor text what you have filled in for the description. Therefore, as mentioned in the previous section, you should think carefully about how you want to name your product categories, as the anchor text plays a crucial role in conveying relevance to search engines.
You can rearrange the categories in the main navigation by dragging and dropping.
Footer and sidebar management
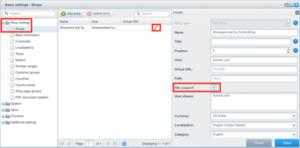
Shopware uses “store page groups” to list links to pages. These groups are assigned to a location on a page, such as your sidebar or footer. When you create a store page group, you assign a template key, which in turn is referenced in your template source code, to display it in a specific location on your pages.
To manage store page groups:
Go to Configuration > Basic settings.
Open the Shop settings folder and navigate to Shop page groups.
On this screen, you can add, edit, and delete store page groups:
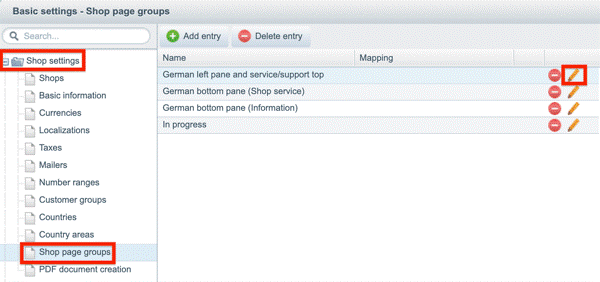
Store page group management in Shopware
When you click on the pencil, the details screen opens, listing what you can define. Make sure you always choose a unique name, define the template key (this is used in the template source) and activate with Active:
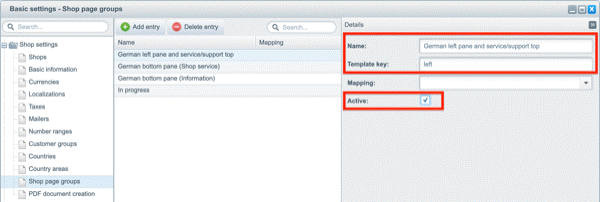
Managing a store page group in Shopware
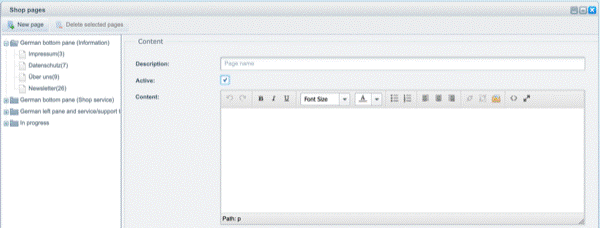
Now that you have defined your store page groups, you can start adding pages.
To do this, go to Content > Shop pages. There you will find the store page groups and if you expand them you will see which pages are included.
Managing a store page group in Shopware
Now that you have defined your store page groups, you can start adding pages.
To do this, go to Content > Shop pages. There you will find the store page groups and if you expand them you will see which pages are included.
Store pages overview in Shopware
Let’s assume you are creating a new page called “Test Page”.
Proceed as follows:
Enter a meaningful Description for the page, set the checkbox to Active, fill in the Content text box, and assign the page to a store page group. In our case we assign it to the top one, “German bottom pane (Information)”.
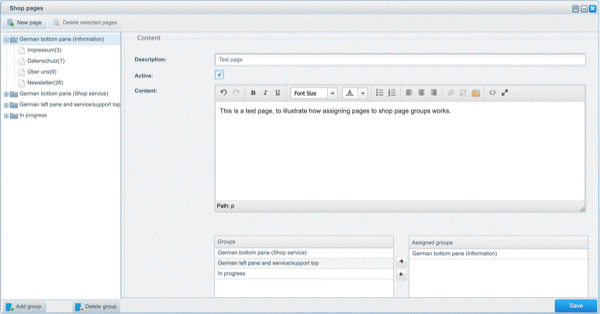
Adding a store page to a store page group in Shopware.
When you click the Save button, you will see that it has been added to the store page group.
Crawling and indexing process: setting your preferences.
In this section you will learn what options you have in Shopware to tell search engines your preferences regarding crawling and indexing processes.
Canonical URLs
Apart from automatic lowercase, there are no settings in Shopware for using canonical URLs.
Meta Robots / X-Robots Tag
Automated instructions communicate your preferences in terms of crawling and indexing processes and are a powerful tool from an SEO perspective.
Handling query parameters in Shopware.
In Shopware, meta robots noindex is added by default to pages that show filtered or sorted products with query parameters. Query parameters are used for example to filter and sort products.
For example, the URL https://domain.com/nuts/almonds?sSupplier=gonuts which shows all products from the manufacturer “Gonuts” has a meta robots noindex tag because it contains the parameter Supplier and this is listed as a query parameter (see below).
To determine which query parameters contain this statement, go to the same screen where we defined the URL structure:
1. configuration > basic settings
2. open the Frontend folder and navigate to SEO / router settings.
You will get to this screen:
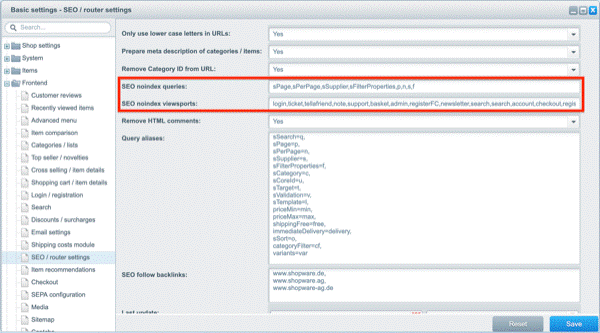
Shopware Robots noindex settings
Search for the field SEO noindex queries.
Adding meta robots noindex to other pages.
On the same screen as shown above, one field below SEO noindex queries, is SEO noindex viewports. The SEO noindex viewports field lists pages that have meta robots noindex added to them. If you create landing pages (target pages) for PPC campaigns, for example, list them here to prevent search engines from indexing them.
Paging: link prev/next
The link prev/next paging attribute indicates the relationship between a set of pages. While Google has announced that it does not use these “hints” to understand these links, it can still be useful to use for other search engines and to help search engines find links more easily in general.
By default, paging attributes are disabled in Shopware, but we recommend enabling them for the reasons mentioned above. With the setting disabled, Shopware automatically adds a canonical URL to the first page in the page row, which is against Google’s best practices. Enabling the setting adds the paging attributes and removes the canonical link to the first page.
To enable the paging attributes:
1. go to Configuration > Basic settings
2. open the Frontend folder and navigate to SEO / router settings
There, find the Use prev/next-tag on paginated sites field and set it to Yes:
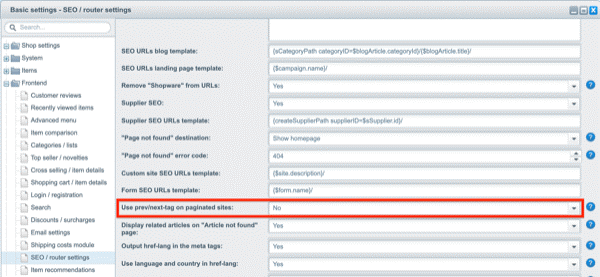
Shopware Paging Settings
Important
Fixing this problem leads to another. There is no self-referencing canon on paired pages. This must be fixed, otherwise a crawler trap could occur. This issue needs to be corrected in the store’s templates. Follow these guidelines when implementing this fix.
Robots.txt
The robots.txt tells the crawlers the rules for their work. Here you can tell them which URLs or sections of your website should not be queried.
By default, Shopware ships with the following robots.txt, which prevents crawlers from accessing account and shopping pages, for example, and points to the XML sitemap.
User-agent: *Disallow: /compare/
Disallow: /checkout/
Disallow: /register/
Disallow: /account/
Disallow: /address/
Disallow: /note/
Disallow: /widgets/
Disallow: /listing/
Disallow: /ticket/
Sitemap: http://domain.com/sitemap_index.xml
In addition to blocking search engines from accessing the above pages, we also recommend the following addition:
Disallow: /searchDisallow: /*?sInquiry=.
The first addition prevents your internal search results pages from being accidentally crawled and indexed. The second addition prevents search engines from accessing URLs that show which products a query was made for.
Professional advice
For stores with more than 10,000 items, we also recommend not allowing URLs with the following query parameters to save on crawl budget:
- sPage
- sPerPage
- sLieferant
- sFilterProperties
- p
- s
- f
- Making changes to your robots.txt
By default, there is no way to manage the content of robots.txt. So you need to either install a plugin or customize the code that generates robots.txt.
Disable blog archive pages
Shopware automatically creates blog archive pages for authors and dates.
Examples:
https://domain.com/blog/category/?sFilterAuthor=Steven
https://domain.com/blog/category/?sFilterDate=2019-09
https://domain.com/blog/category/?sFilterTags=nuts
We strongly recommend disabling them, as they do not add any value, but only burden the crawl budget.
There are no options for this in Shopware, so either make these changes in the template or install a plugin for this task.
XML Sitemap
An XML sitemap is a file that contains all the URLs that search engines should visit and index. This is an efficient way to make your preferences clear to search engines. Therefore, we recommend that you always use an XML sitemap.
Shopware automatically generates a GZIP compressed XML sitemap, which you can find here: http://domain.com/sitemap_index.xml.
These pages are automatically included in the search if they are set to active:
- Product Category Pages
- Product detail pages
- Blog Category Pages
- Blog detail pages
- Manufacturer pages
The following page types are not included:
Normal pages (store pages and form pages).
Making changes to your XML sitemap
Also, Shopware does not support factory default XML sitemaps for images, so we recommend getting a plugin for that or, if you can make changes yourself, edit the source.
XML Sitemap Settings
The only setting available in Shopware for the XML sitemap is the one that determines how it is generated. To change this, go to Configuration > Cache/performance and select Cache/performance:

Navigate to the Shopware XML Sitemap settings.
On the Performance screen, go to the third tab, Settings, and select General > Sitemap.

Settings for the creation of the XML sitemap of Shopware.
XML sitemap renewal should be an automated process. You don’t want the XML sitemap to be generated live after each change, as this will have a big impact on your site’s performance. Therefore, set Via cronjob as the refresh strategy. The value for the cache time of 86400 (in seconds, i.e. one day) is sufficient for most stores. However, you can adjust this value to your needs. If your pages change only once a week, the “one week” setting is fine. If new products are added every hour, it makes sense to set a correspondingly lower value.
In the next step, go to Configuration > Basic Settings > System > Cronjobs, where you have to activate the cronjob for the sitemap creation:

Activate the cronjob for regenerating the XML sitemap
Mobile optimization
A mobile optimized website is a matter of course nowadays. After all, a visitor wants to be able to easily use a website on any device.
Technically, you could do the same thing with separate desktop and mobile websites, but this introduces a variety of problems. For example, the effect of splitting the authority of your URLs between these two versions. An adapting (responsive) website is the de facto standard these days, so we strongly recommend that you opt for it as well.
Shopware’s default template is fully responsive in this sense. However, if you buy templates or have custom templates created, you need to make sure that they are fully responsive as well.
HTTPS
Providing a secure connection is a basic requirement for the success of your site. Fittingly, Shopware offers full support for HTTPS.
All you need to do is install an SSL certificate and enable SSL support via Configuration > Shop Settings > Shop > Your store > SSL support:
Settings for Shopware SSL support
Enabling SSL support causes the HTTPS version of all URLs to become the preferred URL variant for redirects, canonicals, and the URLs included in the XML sitemap.
Optimize your content for maximum relevance
The “Meta Information” and “Heading Structure” sections describe how you can use smart templates to create good titles, meta descriptions, and headings.
Unfortunately, none of this can really be automated – you’ll find that for your most important pages, you’ll need to manually adjust the values generated by the templates.
The good news: Shopware supports this out of the box!
In this section we will show you how to manually adjust the automatically generated values for your titles, meta descriptions and headings.
Product Category Pages
To override the generated values for product category pages, go to: Items > Categories.
When you click on a product category, all settings are displayed in a new window. Scroll all the way down to the CMS functions and Meta information sections:
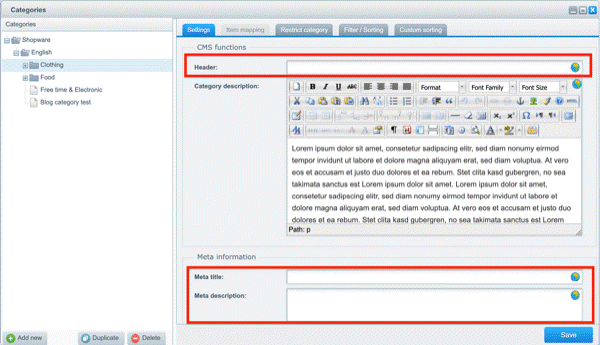
Management of headings and meta information for product categories
By default, the Header, Meta title, and Meta description fields are empty. If you enter values, the automatically generated values are replaced.
Now you may ask, “But what do I enter here?”
The answer is: the result of your keyword research – the keywords you want to highlight.
As a rule of thumb, stick to the following best practices:
Header: make sure it is easy to read, contains your most important keyword and is no longer than 60 characters.
Meta title: include your most important keyword for the product category and keep the length between 285 and 575 pixels (about 30 and 60 characters respectively).
Meta description: again include your most important keyword for the product category and keep the length between 430 and 920 pixels (about 70 or 155 characters).
The above rules of thumb also apply to the other page types mentioned below.
You don’t need to fill anything for the Meta Keywords field, as described in our explanation.
Product detail pages
To customize the values generated for product detail pages, go to: Items > Overview.
Open the product category folder of a product and then click the pencil icon:
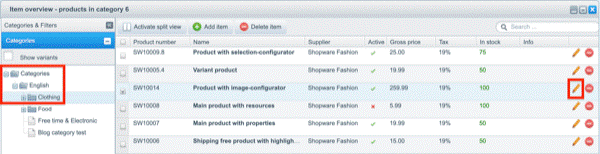
Product data management
On the following screen, you can edit the H1 heading of the product by changing the Item name field in the Basic info section:
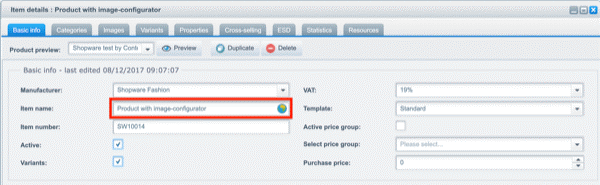
Managing a product name
Important
Note that when you change the item name, the product URL also changes. Shopware automatically redirects the old URL to the new URL; ideally, you do not make such changes.
If you scroll down to the Meta information section, you will find the Meta title and Meta description fields where you can adjust the automatically generated values:
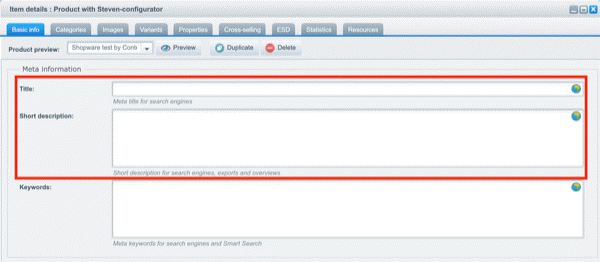
Managing the meta information of a product
Professional advice
If you often run into the situation where you want to have a different H1 heading than the product name, you can create a free text field for the H1 heading and use it to fill in the H1 heading in your templates.
The same goes for the Short description field, as it is used not only as a meta description, but also as a product description on category pages.
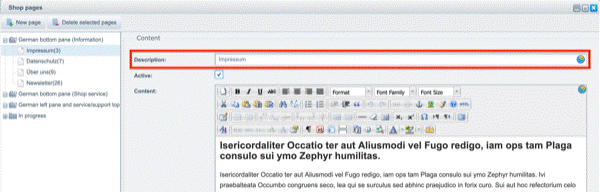
Store pages
Customizing the H1 heading, title and meta description works similarly to the store pages. Just go to Content > Shop pages and select a store page from one of the folders.
The Description field is the H1 heading:
Managing the title of a store page
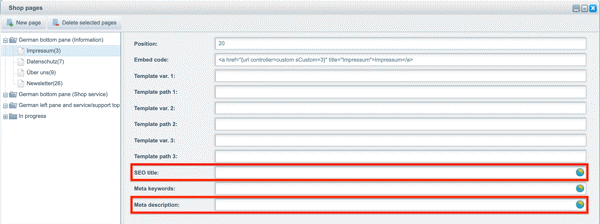
If you scroll further and expand the Settings section, you will find the SEO title and Meta description fields there:
Managing the meta information of a store page
Other pages
Changing the H1 heading, title, and meta description for other page types, such as campaign pages, maker pages, form pages, and blog articles, works very similarly. When you edit these pages, you will find the same or nearly identical fields each time.
Campaign pages: go to Marketing > Shopping Worlds.
Manufacturers pages: go to Items > Manufacturers.
Forms pages: go to Content > forms.
Blog category pages: go to Items > Categories.
Blog article pages: go to Content > Blog.
Other important SEO topics
In this section we will describe other SEO topics that you need to pay attention to Links to external websites
Shopware automatically adds the nofollow link attribute to all links to external sites. Unless they are whitelisted via the SEO follow backlinks field (see screenshot below). In practice, this means that in many cases most links to external sites will have the nofollow link attribute, sending the following message to search engines: “I want to link to this other site, but I don’t trust it, thus they don’t give it any importance.”
We strongly recommend that you disable this feature completely in your template files.
If for some reason this is not possible, you will need to go to the trouble of configuring whitelisted websites using the following steps:
1. configuration > basic settings
2. open the folder Frontend and navigate to SEO / router settings
You will land on this screen:
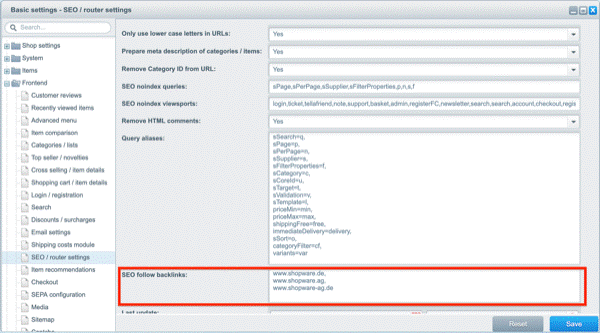
Manage which external links should not be marked as “nofollow”.
Look for the SEO follow backlinks field. All domains listed there are excluded from the nofollow attribute.
Meta keywords
Shopware gives you the option to enter meta keywords in several places.
Meta keywords have not been used by Google for over a decade, and we firmly believe that other search engines have not done them for a very long time either.
Don’t bother typing keywords into the meta keyword field. Writing satisfying content for your visitors or generating links to your product category pages is a much better way to spend your time wisely!
Creating different HTTP status codes for pages that do not exist
Go to
1. configuration > basic settings
2. open the Frontend folder and navigate to SEO / router settings
At the end of the list you will find the “Page not found” error code field. By default it is set to 404 and we strongly recommend leaving it that way. This is the only correct HTTP status code for a page that never existed.
However, for pages that existed in the past, you could specify a status code 410: deleted, but that requires a custom code. In most cases, you will not need it.
Separate XML sitemap for mobile visitors
Shopware’s SEO guide mentions a separate XML sitemap for mobile visitors. A separate XML sitemap for mobile visitors is only useful if you have a separate desktop and mobile website. If you have a design that automatically adapts to the device you are interacting with – in other words, a responsive design – you don’t need to consider this.